Friday, March 31, 2017

Sparkle N Sprinkle April New Release Card Blog Hop {04.01.2017}


Welcome to the Sparkle N Sprinkle
 April Reveal Blog Hop!


NEW STORE - NEW BLOG - NEW PRODUCT LINES!

The sets are:


Girlfriend Support Set 2 - 839  
(Digi version DIGI839BG)

Christmas Holly Blessings - 841  
(Digi version DIGI841B - includes extra sentiment)
**Limited Edition**

Corner Garden - 842  
(Digi version DIGI842FS - includes extra images, decoupage sheets, and digi papers)

Corner Garden Digi Bundle set - DIGI842FS (includes extra images, decoupage sheets, and digi papers)

Proudly Patriotic - 843  
(Digi version DIGI843J)

Vibrant Watercolor Digi Papers DIGI4001FS


The new sets are 20% off until April 3, 2017, so after the blog hop, hop on over to the NEW STORE and have fun shopping - be sure to check out the OTHER amazing new products as well! With names like TONIC STUDIOS, STAMPENDOUS and HOUSE MOUSE, you're sure to fill that cart up quickly!


SNS also has a brand new blog, which can be found here!


On April 3, ONE GRAND PRIZE WINNER will be selected from the comments left on all the Designers' blogs listed below.  Please leave a comment with each designer to be eligible for the Grand Prize (checked for compliance).  The Grand Prize Winner will be announced on the SNS Facebook page and the SNS New Blog.  


 There are FOUR new rubber stamp sets being released this month, plus a new Digi Papers set, and a huge Corner Garden Digi Bundle. 

Also, when you purchase the digi versions of any of the SNS rubber sets, you are getting lots of extras that aren't available otherwise.  These extras include additional images not available with the rubber version, digi papers (in some cases), and now a cut file to use with your electronic cutting machines will also be included with all digi images purchased!

You're definitely going to want both the rubber versions as well as the digi versions of all our new releases.

The new sets are 20% off until April 3, 2017.  So once you finish the blog hop, head on over to the New Store and start shopping.

On April 3rd, ONE GRAND PRIZE WINNER will be selected from the comments left on the Designers' blogs listed below. Please leave a comment with each Designer in order to be eligible for the Grand Prize.  You never know who the Mystery Designer will be that has the winning comment.

The Grand Prize Winner, which will be announced on the SNS Facebook page and the SNS New Blog, will receive ALL of the new rubber stamp sets revealed this month.


The Blog Hop Order this month is:

Diane
Chris ----This is me!
Shona
Eret
Belinda
Corner Garden surprise
Jess
Donna
Anne


(*Tip: if you have difficulty with a particular link, try clicking on the Designer's blog title to send you to their Home page.)


We hope you enjoy the New Reveal Blog Hop as much as we do.  Thanks for joining us and remember to comment on each of the Designers' blogs to be eligible for the Grand Prize (including the Corner Garden surprise post).  
 Wonder who the Mystery Host will be this month????


Have you checked out the SNS YouTube Channel featuring Demo Donna?  If not, then you are in for a real treat.  Subscribe today to get all the latest Demo Donna tips and techniques!


And now, more information about my card!

When I saw the April new releases for Sparkle N Sprinkle, I just had to use this stamp set! This set, Proudly Patriotic, has some great features on it, notably, the cherry blossoms and fireworks! The first thing I did was size and print out the flag, in color, using the digi version of Proudly Patriotic stamp set. Here is the card I made.

After printing out the digi image in color and die cutting it into an oval shape, I used the Nuvo Glue Pen Small Tip to roll on adhesive and start adding all sorts of glitter! I used Bubble Gum glitter on the cherry blossoms. I LOVE cherry blossoms, and have been in Washington DC, one of my favorite U.S. cities, during the cherry blossom festival. So gorgeous! Cherry blossoms hold a very special place in my heart. When I saw this set, I focused on those gorgeous cherry blossoms and had to highlight them! I also used Margarita glitter on the leaves. Here is a close up of those beautiful and sparkly blossoms! It also shows the frame I die cut to surround the oval image. To make the frame, I covered a piece of white cardstock with 2-1/2" Tear-ific Tape, and then die cut it into an oval shape. I sprinkled on and burnished in Denim glitter.

I used Daisy glitter on the yellow fireworks. Here is a close up of that amazing glitter that made these fireworks look so pretty! This photo also shows the additional frame oval. Again, I covered a piece of white cardstock with 2-1/2" Tear-ific Tape, and then die cut it into an oval shape. I sprinkled on and burnished in Bubble Gum glitter.  

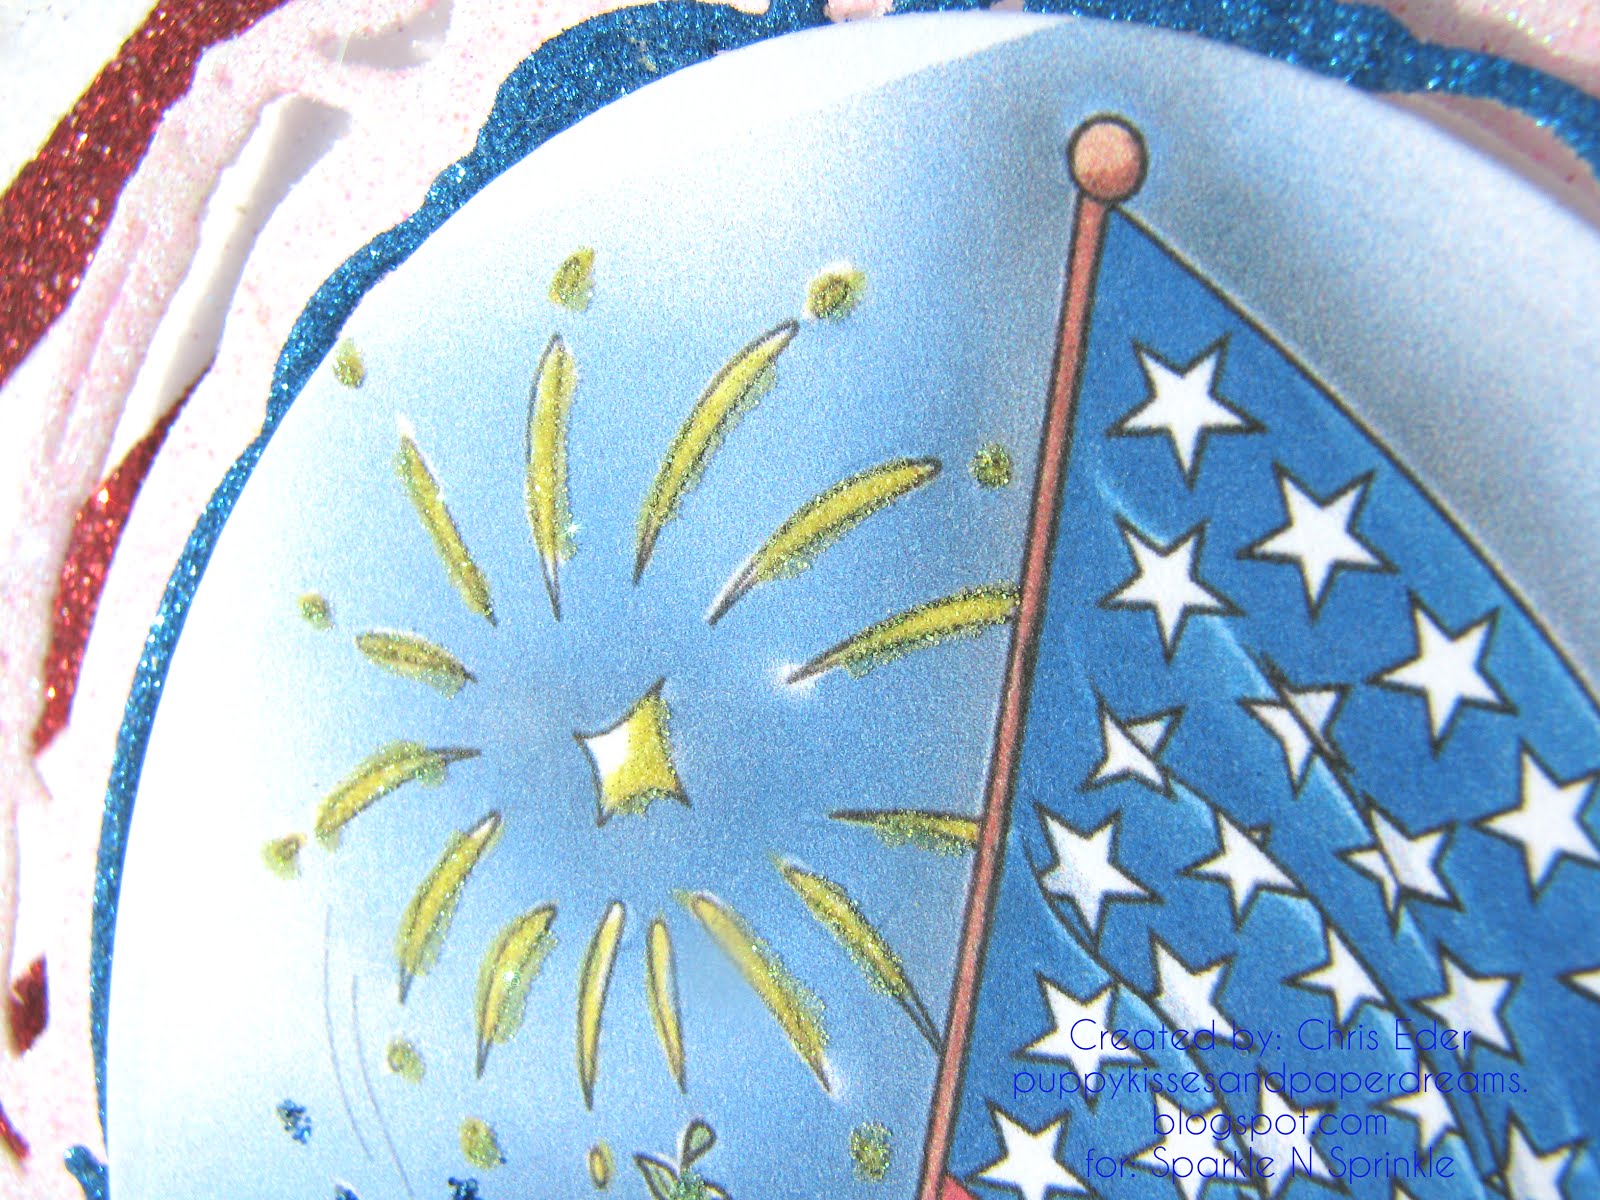
Here is another photo that better captures the cherry blossoms, along with all of the fireworks. I used Blue Lighting glitter on the blue fireworks, and Raspberry Soda glitter on the reddish pink fireworks.

I also created a background on the card. I laid strips of 1/4" Tear-ific Tape at an angle, and then die cut the card panel with a scalloped rectangle die. Then, I pulled off the release tape from every other stripe. I dumped on Bridal glitter to make the white stripes, and burnished it in. Then, I released the rest of the stripes and dumped on Gypsy Red glitter and burnished that in. Once this was done, I had a background that looked a lot like stripes on the U.S. flag! Look at that sparkle!

I treated a piece of red cardstock with my Anti Static Bag, and then stamped out the sentiment using the Proudly Patriotic stamp set, using Versamark Ink. It is GREAT combining the digi version and rubber stamp sets. I sprinkled on White Detail embossing powder, and heat set it. I die cut the sentiment with a scalloped rectangle die, and framed it with black cardstock die cut with a rectangle die. Here is the awesome sentiment.

Here is another photo of the full card. This one was really fun to make, and like I said, I LOVE cherry blossoms ... this card will always make me happy because of those gorgeous blossoms!!!!

And, cuz I am a total geek, here is a photo of me and my sweet baboo in Washington DC, on a Segway Tour (SO MUCH FUN!) in front of a gorgeous cherry tree. This was a really fun trip. We had a great time on this Segway tour. I highly recommend doing one, if you ever get a chance in whatever city you are visiting. Lots of places do them, and Segways are awesome!


The next stop on our blog hop is Shona. She has something extra special in store for you, I know you will love it! Enjoy!!


These April new stamps are absolutely incredible. I hope you enjoy them as much as I do!!!!

Thanks for stopping by. Have a magical day!

-Chris

Sparkle N Sprinkle compensated links are used when possible.

It's [NOT] a Penguin Mom Card (#13/52) {03.31.2017}

Okay ... This is an inside joke about a penguin. A few years ago, while we were vacationing in Hawaii with my parents, my friends and I saw something in a tree across the golf course. We were trying to figure out what it was, and my Mom said, "It's not a penguin." We don't know why she ever came up with that, since ya know, penguins aren't indigenous to Hawaii or anything! So, I like to highlight penguins for my Mom as much as I can. Here is a card with a penguin on it! I used supplies from the April card kit from Simon Says Stamp.

I stamped out the giraffe, penguin, hearts, and sentiment from the stamp set in the card kit. I colored the images and sentiment with Prismacolor pencils. I die cut the card panel using Lawn Fawn's Stitched Rectangles die. I also die cut some patterned paper from the card kit, that is Lawn Fawn's Perfectly Plaid Rainbow Petite Pack using Lawn Fawn's Scalloped Rectangles die. I layered everything onto a card base from cardstock from the card kit. Then, I added glossy accents over the eyes and the hearts. Here is a close up of the penguin eyes. The shine is much brighter in person.

Here is a closeup of the glossy accents over the hearts. The shine is more evident in these photos!

I hope my Mom figures out there is a PENGUIN on the card and gets the inside joke ... we'll see. She was so serious when she said it, I can't believe she actually thought there could have been a penguin IN A TREE, IN HAWAII! Silly girl!

Thanks for stopping by. Have a magical day!

-Chris

Sparkle N Sprinkle compensated links are used when possible.

Friday, March 24, 2017

Z-Fold Peacock Mom Card (#12/52) {03.24.2017}

Another card for Mommy! This one was a newish technique for me. I made a Z-Fold card. Here is the card that I made.

To make this card, I started with a 12"x12" piece of paper. I cut it on a slant, so that the back of the card would be taller than the front. Then, I punched the top edge (the edge that was on the angle) with a border punch. I scored the card at 4" and 8". Then, fold it up into a Z and that is the base and it is ready to go! I cut patterned paper to fit each panel, and die cut some more patterned paper into label die shapes. I also cut some patterned paper with a roll-up rose die and rolled it into a rose. Here is the card folded shut.

I stamped the sentiment from Lawn Fawn's Happy Happy Happy stamp set with Versamark Ink, and then sprinkled on Mediterranean embossing powder from Sparkle N Sprinkle, and heat set it.

Here is what it looks like opened. The shortest panel is on the front, the middle section is also decorated, and the peacock tallest section is the back of the card.

Here is a top view, to show how it looks when it is folded out.

I really like the colors on this card, and I think Mom will too. She loves blue, and this has a lot of blue shades. She also likes peacocks. They are such beautiful birds!

Thanks for stopping by. Have a magical day!

-Chris

Sparkle N Sprinkle compensated links are used when possible.

Wednesday, March 22, 2017

Sparkle N Sprinkle Patriotic Girlfriends March Release {03.22.2017}

Hi from Designer Chris! I love this new Sparkle N Sprinkle stamp set. It is Patriotic Girlfriends, and is awesome! I used the digital version, and printed out the colored images. Here is what I made. 
Patriotic Girlfriends 827 Step Card
One of the awesome things about using digi stamps is that we can size them to whatever size we want. Since I was using a step card base design, I sized the main image of the two Patriotic Girlfriends and their flag to fit the main section of the card. And, I printed the colored image too. A lot of the digi stamp sets come with both the black/white image that you can color, or the already-colored image which has gorgeous coloring. This allowed me to jump right in and start decorating my card instead of coloring all the images. First up, I draw on adhesive using the Nuvo Glue Pen Small Tip and then sprinkled on Bridal glitter to give the flag and stars some sparkle. You can see that gorgeous glitter here. 
Patriotic Girlfriends DIGI827 Flag
As I decorated and blinged up the card, I used a "Love" die cut and then covered it with Versamark Ink and then sprinkled on Sparkle embossing powder and heat embossed it. This gave such a beautiful sparkle. 
Sentiment with Sparkle Embossing Powder
Here is another die cut image of a heart to help decorate the card, which I also covered with Versamark Ink and Sparkle embossing powder and heat embossed it. 
Sparkle Embossing Powder
One of the sentiments in the Patriotic Girlfriends is this great "America." I sized and printed out the America from the digital stamp set. I used more of the Nuvo Glue Pen Small Tip and then sprinkled on Blue Lightning and Gypsy Red glitters.  
America sentiment
These two girlfriends are in it to win it! I used more of the Nuvo Glue Pen Small Tip to add adhesive to their uniforms and drum. I sprinkled on Blue Jewel and Rose Gold glitters. This gave some nice extra sparkle and bling to these sassy gals.  
Patriotic Girlfriends
Here is another image of the glitter on the uniforms and flag.  
Patriotic Girlfriends
This card was so much fun to make. I love the red, white, and blue, and all the sparkle. Those two girlfriends stick with each other through thick and thin, and they are still trucking! I hope you enjoy this stamp set and make some great cards and projects with it!

Thanks for stopping by. Have a magical day!

-Chris 

Sparkle N Sprinkle compensated links are used when possible.

Monday, March 20, 2017

Dad's Birthday! {03.20.2017}

Today is my Dad's 81st birthday. He is a retired Civil Engineer. I try to make masculine yet interactive or dimensional cards for him since he likes complexity ... This is what I made for him this year. Let's say hello.

I used Lawn Fawn's Out Of This World stamp set and matching dies. I also used Lawn Fawn's Slide on Over Circles dies. Here is a close up of the astronaut on one of the sliders, around one of the sentiments. I did two sliders on this card, this one for the astronaut, and another one for Saturn.

To start the card, I created a galaxy. This was really fun! I pulled out several distress inks in purple, pink, and blues. I blended them onto white cardstock. It didn't really matter what it looked like, so I didn't have to be careful or blend perfectly. Then, once I had the colors down, I lightly blended over all the color with Black Soot distress ink. I spritzed on some water droplets, and then daubbed them up with a paper towel. This gave the galaxy a bit more dimension and texture. Then, to top it all off, I put a few blotches of Copic Opaque White onto an acrylic block. I sprinkled on some of Sparkle N Sprinkle's Sparking Snow glitter, and added in a drop or two of water to thin it down. Using a paintbrush, I then flicked the paint-glitter mixture onto the background. This created splatters that look like stars. It was really fun to make, and the glitter really made the white splatters pop and sparkle. Unfortunately, I couldn't capture any of this in these photographs, but it was really cool in real life!

I colored the images with Copic markers. This is a close up of Earth, and I also highlighted it a bit with a Wink of Stella clear sparkle pen. This photo shows some of the sparkle from the pen, but it is more sparkly in real life.

Here is Saturn, in its slider component. It was really fun to spin and slide Saturn around in circles :)

Here is a close up of the astronaut and the sentiment. I stamped out the sentiment in Versamark Ink, and sprinkled on Sparkle N Sprinkle's White Detail embossing powder and heat set it. The astronaut spins around this sentiment and it was really fun to play with!

I always like to decorate the inside of my card. I cut Lawn Fawn's Watercolor Wishes Petite Paper Pack. I used two colors, a sand or sunset type color, and a soft blue, which made me think of the sky. I used the blue for the front cover inside, and the sunset color for the actual inside of the card. Here are the two inside pieces.

I used another sentiment from the stamp set, and stamped it with a black ink and sprinkled on Sparkle N Sprinkle's Clear Detail embossing powder and heat set it. This photo shows how great and shiny the clear embossing powder is after it is heat set. I love this!

I hope my Dad likes this card. I had a lot of fun making it, and learned new techniques. He is a big kid at heart, so will hopefully enjoy the interactive parts.

And, I have entered this in Lawn Fawnatics Challenge #1 Happy Birthday.


Thanks for stopping by. Have a magical day!

-Chris

Sparkle N Sprinkle compensated links are used when possible.

Friday, March 17, 2017

Life is Sweet Mom Card (#11/52) {03.17.2017}

Hi! Today's card for Mommy is a sweet (tee hee, pun intended!) card. Let's dive right in and check it out.

I used items from the February Simon Says Stamp monthly card kit. I used Lawn Fawn's Stitched Rectangles to die cut out one of the patterned papers from the card kit. I also used Lawn Fawn's Scalloped Rectangles to die cut another piece of patterned paper. I also blended on some Distress Inks to the edges of the papers. I used Picked Raspberry for the pink paper, and Vintage Photo for the brown paper. You can see the distressing below.

I also used Lawn Fawn's Stitched Rectangles to die cut out a piece of patterned paper and I adhered it to the inside of the the card. I like to do something to the inside of the card, if I can. This one was easy, since it was a coordinating piece of patterned paper from the February Simon Says Stamp monthly card kit.

I hope Mom likes this. It was a very easy card to whip together, and it also helped me stretch my wings with using patterned paper. I love it, but sometimes don't know how to use it. This was a fun one, and I might have to keep this idea in mind for other cards that can be pulled together quickly when I need something on the fly.
Thanks for stopping by. Have a magical day!

-Chris

Sparkle N Sprinkle compensated links are used when possible.

Wednesday, March 15, 2017

Sparkle N Sprinkle Irish Blessings Card {03.15.2017]

Hi! Today's card is another new March release stamp set from Sparkle N Sprinkle. This stamp set is the really fun and lucky Irish Blessings - St. Patrick's Day stamp set. Let's check it out.

I created some roses from a die cut in my stash, and brushed on some Brushable Glue and sprinkled on some Celestial glitter. I also die cut some leaves and brushed on some Brushable Glue to the edges and sprinkled on some Luau Green glitter for those too. These flowers were really fun and surrounded my sentiment and image really well, which we will see next.

I treated my cardstock with the Anti Static Bag, and stamped the good luck sentiment in Versamark Ink, and sprinkled on Gold Detail embossing powder, and heat set it. The font on this sentiment makes me swoon. I think it is absolutely gorgeous!

I also stamped out the horseshoe image. This is such a great image and I think it is really lucky! Like above, I treated my cardstock with the Anti Static Bag, and stamped the horseshoe image in Versamark Ink, and sprinkled on Gold Detail embossing powder, and heat set it. This image is really fun and I love the detail of the horseshoes, ribbon, and shamrocks.

I used rectangle die cuts to cut out the card panel and the sentiment/image panel. I die cut coordinating scalloped rectangles to provide a frame for the recentangles. I treated the scalloped layers with the Anti Static Bag, and swiped the scalloped edges with Versamark Ink, and sprinkled on Gold Detail embossing powder, and heat set it. I did a second layer to make sure the gold embossing was deep and provided full coverage. I also stamped the small clover from the stamp set in green ink to provide texture and color to the background of the card panel. Here is a close up of the gold embossed edges and clover stamped background!

I think this is a really fun stamp set and it is lucky! Give it a try - I can't wait to see what you create with it.

Thanks for stopping by. Have a magical day!

-Chris

Sparkle N Sprinkle compensated links are used when possible.

Monday, March 13, 2017

Thank You Tag {03.13.2017)

Today's post is something that is easy and fun to make. I made a Thank You tag for a thank you gift that I gave a friend. Here is the tag.

I pulled out a tag die from my stash, and die cut out two tags from patterned paper. I die cut one of them with Memory Box's Thank You die (which unfortunately I think has been retired). I layered the two together, and added a die cut flourish. I also added a few blingly blue rhinestones.

This was quick but it sure helped decorate up the gift and made my friend happy. I love making little gifties, cards, and whatnots for people and I try to say thank you as often as I can!

Thanks for stopping by. Have a magical day!

-Chris

Sparkle N Sprinkle compensated links are used when possible.

Friday, March 10, 2017

Floral Background Embossed Mom Card (#10/52) {03.10.2017}

Okay, so today's card is something that I have wanted to try, and it is really easy, so I don't know why I waited so long to give this a try! I stamped out a large background stamp. (I think it is a Hero Arts background stamp, but I am not sure.) I stamped my card panel, and covered it with Sparkle N Sprinkle's Skylight embossing powder, and heat set it. I die cut the card panel with Lawn Fawn's Stitched Rectangles die. That is pretty much it! Let's check it out.

The above photo doesn't quite do it justice ... the fully embossed background was so pretty in real life, and the image of the flowers really stood out, yet was subtle. Here is a close up photo of the main flower - I think of it as a peony, but not really sure what it is.

I also did up the inside, like I like to do. I stamped out the "just wanted to say" sentiment from Lawn Fawn in black ink (gack! can't remember which stamp set!), then covered it with Sparkle N Sprinkle's Clear Detail embossing power and heat set it. I also stamped out an Alt E New's Halftone Hello stamp set's "hello" sentiment in a light colored ink, then stamped again over it using a stamp position, with Versamark Ink. Then, I sprinkled on Sparkle N Sprinkle's Sparkle embossing powder and heat set it too. This really sparkled, and was really fun. Here is what the inside looked like.

Even though this card is simple and easy to reproduce or mass produce, I really like it and love the colors. I love that is stylish yet simple. My kind of card! Mom really likes blue, that is her favorite color, so I hope she really likes it too.
Thanks for stopping by. Have a magical day!

-Chris

Sparkle N Sprinkle compensated links are used when possible.

Wednesday, March 8, 2017

Sparkle N Sprinkle Flowers Silhouettes & Mousse Card {03.08.2017}

Here is a copy of my post that is appearing on Sparkle N Sprinkle's blog today. You can check it out there, or here. Either way, enjoy!

Hi from Designer Chris!

Silhouette Stamps

I love silhouette stamps. They can be used in multiple ways, and today's card is using the Flower Silhouettes Stamp Set, one of Sparkle N Sprinkle's new March releases. This stamp set is FABULOUS! Let's peek at my card.
Flowers Silhouette stamped card

Nuvo Embellishment Mousse

For this card, I wanted to see if I could emboss OVER a Moussed background ... so I tried it! I love experimenting. I keep reminding myself that if it doesn't work, it is only paper and I can pitch it, or figure out a way to repurpose it. In this case, it worked out great to heat emboss over mousse! I pulled out two my of my favorite Mousse color Peony Pink and Pure Platinum. I rubbed some of the Pure Platinum mousse across the bottom of my card panel, and then Peony Pink above that. I felt like I needed some blue to have a hint of a sky in the background. I didn't have any blue mousse, so I thought, what the heck? And whipped out my Nuvo Crystal Drops Caribbean Ocean. I rubbed some of the Carribean Ocean drops over the card panel and it also worked out just as I was hoping! Here is what the background looked like, after rubbing in the Mousse and Crystal Drops. I let it dry for about 20-30 minutes and was ready to proceed to the stamping.
Mousse background

Heat Embossing & Nuvo Crystal Drops

After creating the background, I treated the background with my Anti Static Bag, then stamped the flower silhouette image onto my background with Versamark Ink Pad. Then, I sprinkled on Black Detail embossing powder and heat set it. Then I started decorating! I colored in the flowers with individual Crystal Drops. I used: Strawberry CoulisRipened PumpkinDandelion Yellow, and Carnation Pink. I also used Sunlit Meadow drops to add highlights and sparkle to the flower leaves. I also added Caribbean Ocean to the butterflies.
Flowers stamped

Sentiment

I wanted to stamp out the sentiment too, but wanted it to coordinate with the card. I rubbed more Peony Pink Mousse onto some cardstock, but this time I layered it in a solid, thick layer to make a strong pink background. I treated the cardstock with my Anti Static Bag, then stamped the sentiment with the Versamark Ink Pad. I sprinkled on White Detail embossing powder and heat set it. Then, I die cut it into a long rectangle shape. Here is how it looked.
Sentiment over mousse background banner

"Tear-ific" Tape

Here is the frame I created for the card. I did multiple layers. I die cut out the main card panel using a label die. Then, I covered another card panel with two strips of 2-1/2" "Tear-ific" Tape to cover the entire surface. I die cut it with a label die for the "Kiss" Technique. I pulled away bits of release paper and then burnished in Cloud Nine glitter. I removed the rest of the release paper, and burnished in Luau Green glitter. This made a really fun frame layer immediately behind my image panel. I die cut a pink piece of textured cardstock, and layered that behind the Luau Green/Cloud Nine frame layer. Needing just a teeny bit more sparkle, I cut another card panel, and layered more strips of 2-1/2" "Tear-ific" Tape to cover the entire surface and removed the release paper. I adhered the card front to the exposed tape, then burnished in Tiger Orange glitter to the remaining exposed adhesive. This created a bold orange frame around the card. Here is a close up of the frame.
Glitter frame


I tied a triple-loop bow in pink and silver ribbon, and attached it to the edge. This finished off my card.
Bow


This card was a wonderful experiment that I am glad I tried. I will definitely use Mousse and Nuvo Crystal Drops as backgrounds again. I hope you enjoyed it too!
Flower Silhouette card

Thanks for stopping by. Have a magical day!

-Chris 

Sparkle N Sprinkle compensated links are used when possible.