Tuesday, February 28, 2017

Sparkle N Sprinkle March 2017 Release {03.01.2017}

Welcome to the ALL NEW 
Sparkle N Sprinkle

 March Reveal Blog Hop!


NEW STORE - NEW BLOG - NEW PRODUCT LINES!


There are FOUR new rubber stamp sets being released this month, plus a new Digi Papers set, and a Digi Only Bundle set full of lots of extras.   

The sets are:


Flower Silhouettes - 824  (digi version - DIGI824BG)

Patriotic Girlfriends - 827  (digi version - DIGI827J)

Irish Blessings - St. Patrick's Day - 834  (digi version  DIGI834B - includes additional images)

Bonnet Bouquet - 838  (digi version - DIGI838J)

DIGI3130FS - Blue Pansies Digi Bundle Pack   (includes lots of images, decoupage sheets, sentiments, and papers)

DIGI4002FS - Digi Watercolor Papers: Blue 

When you purchase the digital versions of any of the SNS rubber sets, you are getting lots of extras that are not available otherwise.  These extras can include additional images, sentiments, digi papers, and/or decoupage sheets that not available with the rubber version.  

Every new digi set purchased always includes the following:
 ~ black and white images
~ colored images
  ~ .jpeg format (white background) 
~ .png format (transparent background) 
 ~ a cut file to use with your electronic cutting machines!


You're definitely going to want both the rubber versions AND the digital versions of all our new releases.


The new sets are 20% off until March 3, 2017, so after the blog hop, hop on over to the NEW STORE and have fun shopping - be sure to check out the OTHER amazing new products as well! With names like TONIC and STAMPENDOUS and HOUSE MOUSE, you're sure to fill that cart up quickly!


SNS also has a brand new blog, which can be found here!


On March 3, ONE GRAND PRIZE WINNER will be selected from the comments left on all the Designers' blogs listed below.  Please leave a comment with each designer to be eligible for the Grand Prize (checked for compliance).  The Grand Prize Winner will be announced on the SNS Facebook page and the SNS New Blog.  

The Blog Hop Order this month is:

Anne
Jess
Eret
Donna
Shona
Diane
Chris
Belinda

(*Tip: if you have difficulty with a particular link, try clicking on the Designer's blog title to send you to their Home page.)


We hope you enjoy the New Reveal Blog Hop as much as we do.  Thanks for joining us and remember to comment on each of the Designers' blogs to be eligible for the Grand Prize.  
 Wonder who the Mystery Host will be this month????


Have you checked out the SNS YouTube Channel featuring Demo Donna?  If not, then you are in for a real treat.  Subscribe today to get all the latest Demo Donna tips and techniques!


I had so much fun with the Bonnet Bouquet stamp set. I used both the rubber stamp set, for the sentiment, and the digi version for the actual bonnet itself. I like using both, and it is so versatile to do it this way. I used the digi version for the image. I sized and printed it out, then die cut out the image. I also was inspired by Demo Donna (she creates some INCREDIBLE cards!) in one of her recent videos on her YouTube channel. The card she designed in this video had a partial die cut across the fold. I was inspired by her design, and did a partial die cut label over the fold. This way, the "top" part of the label is actually on the back of the card and the "bottom" part is on the front flap of the card. Hard to explain, but easy to understand when ya see it. Here is my card.


I created this background for the partial die cut label, and I loved it so much, I actually didn't want to cover it up with the die cut bonnet image ... but I couldn't figure out where else to put it, so I covered most of it up. I still like how it ended up looking, but this background was gorgeous! To make this background, I  placed some strips of 2-1/2" "Tear-ific" Tape behind some green cardstock and die cut it in the label shape. Then, I did the "kiss-cut" technique. I pulled out the Tonic Die Simply Screens Clematis Vine die cut, laid it across the cardstock label, and die cut it. I removed all the pieces, but the vine parts were still there, and they were stuck down to the adhesive behind the cardstock. As you can see, Because the vine die didn't completely cover the label, I laid it horizontally across the middle of the die label, die cut it, and then repeated it across the top and bottom to completely cover the full label with vine pieces. Once I removed all the cut pieces, I burnished in Ocean glitter with my finger tool :) Then, I removed the backing of the "Tear-ific" Tape behind the vine background, and adhered it to the partial die cut labael area. Here is what it looked like before I put the main image over it.

I stamped out the small flower in the stamp set, in a green ink to make it tone on tone. Then, I treated my cardstock with the Anti Static Bag, and I stamped the sentiment using Versamark Ink and heat embossed Forest Green embossing powder. Check out this fabulous sentiment!.

The real fun began when I blinged out the color printed bonnet image! This is what is so much fun about using a colored digi stamp. The coloring is already done, and I can spend my time adding to the existing image instead of coloring it and then playing! I used my Nuvo Glue Pen Small Tip to daub on some adhesive in the image. I added adhesive to the yellow flowers, and then sprinkled on Evening Glow glitter. I added more adhesive to the purple flowers, and sprinkled on Orchid glitter. I did more adhesive on the ribbon, and sprinkled on Ocean glitter. The hat itself was blinged out with Autumn Medley glitter. Here is the bonnet with all its sparkle and bling!

I also wanted to incorporate a border punch. I punched out some patterned paper with a border punch, and layered some 1-1/2" "Tear-ific" Tape behind the punched part. I burnished in some Denim glitter and viola! I had a beautifully decorated border! Here it is close up.

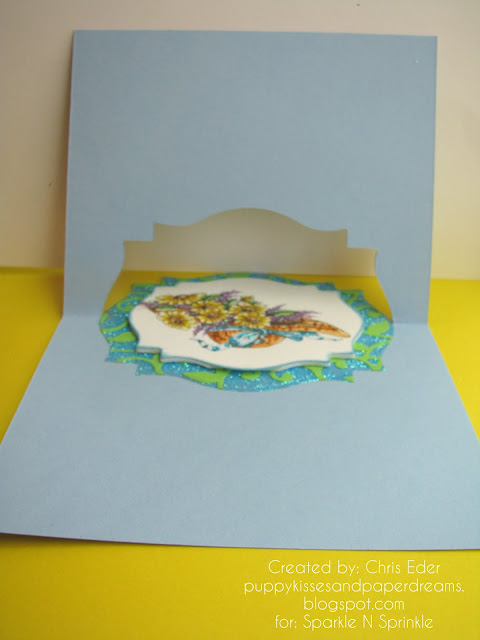
Here is the card opened, so you can see how the partial die cut across the fold looks. I partially die cut only the top part of the die label.

This was a really fun card to make, and I love this stamp set. I am so glad I used both the rubber and the digi image. They worked together great!

Check out the new Sparkle N Sprinkle website. It sure is nicely organized and easy to navigate!

The next stop on our blog hop is Belinda She has a REAL TREAT for you, so hop on over to her blog and be inspired and awed!

Thanks for stopping by. Have a magical day!

-Chris

Sparkle N Sprinkle compensated links are used when possible.

Monday, February 27, 2017

Wobbly Ruff You Card {02.27.2017}

I made a little card for my sweet baboo. I was inspired by Tim Holtz's Crazy Dogs stamp set, and I had to make something silly and fun. We have two crazy and exuberant doggies, and this stamp kinda looks like one of our pups. I colored this doggie like one of ours. I also put the doggie on an action wobble, so it bobs around. Again, kinda like one of our pups! I stamped the image, then colored him with Copic markers.

After I colored him, I stamped him again, using a stamp positioner, in black ink and then sprinkled on Sparkle N Sprinkle's Clear Detail embossing powder and heat set it. I like to do this after I color since sometimes alcohol markers and embossing powder don't play well together. Using a stamp positioner makes it really easy. You can the embossing powder better in this photo - I changed up the lighting from the photo above to make the embossing powder show up better. After doing the embossing powder, I die cut out the doggie using the matching die. Then, I mounted him on a die cut circle, attached the action wobble, and layered up with some patterned paper.

Here is one of our pups, the one I modeled this card after. He is a handful and very entertaining. He is a lot of fun and we are so lucky to have him as part of our family.


This was a really fun card to make, and I think it brightened up my sweet baboo's day. He is a lot of fun, and I wanted to make him something to let him know I think the world of him.

Thanks for stopping by. Have a magical day!

-Chris

Sparkle N Sprinkle compensated links are used when possible.

Friday, February 24, 2017

Hummingbird Card for Mom [#08/52] {02.24.2017}

Today's card is another one for my Mommy. I love hummingbirds, and she helps support my crazy habit. She has sent me some fun things that have hummingbirds on them. So, I made her a card with one of the funnest birds there is! Here is the card.

I was inspired by a hummingbird card I saw online by the Local King Rubber Stamp company. I used that inspiration for this card. I stamped some flowers from the Hummingbirds stamp set from Stampendous with Versamark Ink onto colored cardstock, after treating it with my Anti Static Bag. I sprinkled on Sparkle N Sprinkle's Black Detail embossing powder, and heat set it. I also ink blended some green and blue inks over the flowers and leaves to make the images a little more fun. I also stamped out the hummingbird on white cardstock, with black ink. I blended ink over the hummingbird with Distress Inks, then die cut it out with the matching dies. I also die cut the hummingbird die from the colored cardstock panel to create a negative space of the hummingbird, so that I could inlay the hummingbird. After ink blending the hummer, I covered it with Wink of Stella clear to give it a little shine. This photo doesn't quite show how sparkly the bird is in real life.

I also stamped out a sentiment from Sparkle N Sprinkle's Hummingbird 1 stamp set with Versamark Ink and heat set it. I sprinkled on White Detail embossing powder and heat set it. The white embossing helped tie the white of the hummingbird together.

I also made a matching envelope. I colored the stamps with Distress Inks and stamped the images onto the envelope. I used the same two colors I used for ink blending, and wasn't really precise where I applied the ink colors. This gave the image some color and helped connect the envelope to the card. I love to do a matching envelope, and this one was a lot of fun.

Hummingbirds are gorgeous and have such character. They are fun to watch and I really enjoy them. I know Mom will like this card, and she will know that I was thinking of her when I made it.

Thanks for stopping by. Have a magical day!

-Chris

Sparkle N Sprinkle compensated links are used when possible.

Wednesday, February 22, 2017

Sparkle N Sprinkle Girl Friend Support Pink Attitude {02.22.2017}

Girl Friend Support Set 1

Howdy! This is a copy of my blog post that is also appearing at Sparkle N Sprinkle's blog today. When I saw this Girl Friend Support Set 1, which is one of Sparkle N Sprinkle's new releases for February 2017, I knew I had to have it! The sentiments are great, and the images are so much fun! Let's check out the card I made using this stamp set.

Glitters and Embossing Powders

I stamped the bustier using my Versamark Ink Pad on kraft cardstock, that I had dusted with my Anti Static Bag, and sprinkled on Flashy Flamingo embossing powder and heat set it. Then, I die cut it into an oval shape. I whipped out my Nuvo Glue Pen Small Tip and added a line of adhesive inside the oval edge. I sprinkled on Bubble Gum glitter to make it a little more sparkly!


Using my Anti Static Bag and my Versamark Ink Pad again, I stamped out the sentiment on more kraft cardstock, and sprinkled on more Flashy Flamingo embossing powder and heat set it. I also used the Nuvo Glue Pen Small Tip to roll on adhesive inside the edge after I die cut it into a wonky rectangle.


I made a background on my card base. I stamped out the same bustier image with white ink to create the background. I also laid down a strip of 1/4" "Tear-ific" Tape on the card base, and two strips of 1/8" "Tear-ific" Tape as well. I pulled off the top release paper, and dusted on Raspberry Soda glitter and burnished in with my finger tool. This really pulled the sparkly pink together and grounded the oval bustier image with the Flashy Flamingo embossing powder. So pretty!


I die cut a scalloped rectangle and wiped the edges with the Versamark Ink Pad. I sprinkled on more Flashy Flamingo embossing powder, and heat set it. This made a really fun edge and perfectly matched the colors I used :)


This was a really fun card to make, and I love it! I love pink, I love the sentiments, I love the bustier image in this stamp set - everything is fun, fun, fun! I know you will love this set too, you need to get it!


This set is really versatile, and it was lots of fun to play with. Here is the stamp set.

Thanks for stopping by. Have a magical day!

-Chris

Sparkle N Sprinkle compensated links are used when possible.

Monday, February 20, 2017

You Are Awesome Crazy Dog Wobble Card {02.20.2017}

Hello! Today's card is a card I made for my nephew. I sent him a gift card, and this was the card I created to send him his gift. Let's check it out!

I stamped out one of Tim Holtz's Crazy Dogs and some accessories. I colored the images with Copic markers, then stamped them again in black ink (using a stamp positioner) and sprinkled on Clear Detail embossing powder from Sparkle N Sprinkle, and heat set it. I often do this, adding the embossing powder after coloring, since alcohol-based markers and embossing powder don't like each other. This way, I get a nice stamped image that I color, and also have some embossing as well.

I created a card with a 1/2" dimension to it and cut out the front panel. I die cut a scalloped rectangle frame as well. I die cut a circle and hill, and mounted the dog and accessories on the circle. I mounted the circle onto an Action Wobble and adhered that to the background, which I had ink blended over some puffy cloud die images. The cloud background is hard to see in these photos because I took the photos in bright sunlight. But, it is really cool in real life.

Since I was sending him a gift card, I created a little gift card envelope pocket and mounted it inside the card. I also stamped a sentiment with versamark ink and heat set Sparkle N Sprinkle's Platinum embossing powder.

I hope my nephew enjoys this card. I feel I am masculine-card challenged, but this one was a lot of fun.

Thanks for stopping by. Have a magical day!

-Chris

Sparkle N Sprinkle compensated links are used when possible.

Friday, February 17, 2017

Lilac Gatefold Card for Mom [#07/52] {02.17.2017}

Hi! I saw a Gatefold card on Jennifer McGuire's blog, and I decided to replicate it for a card for my Mommy. It was a fun card to make, and I love how it turned out. Let's check it out.

I will get back to how I made the card, but here is the sentiment I stamped out. I stamped it in black ink, and then sprinkled on Sparkle N Sprinkle's Sparkle embossing powder and heat set it. This made the sentiment shiny and sparkly and oh so pretty!

Okay, back to the gatefold card. Following the directions on Jennifer's blog post, I cut two pieces of white cardstock to 4-1/4" by 7-1/2" and then scored each piece at the 2" mark. I folded each piece at the 2" mark, and reinforced the fold with my teflon bone folder. I stamped the flowers and leaves towards the bottom of one of the full card panels. I stamped fully across the card panel, and then fussy cut away the bottom part of the card. I also stamped the sentiment on the upper edge of the other piece of cardstock's 2" piece. Once both parts were stamped, I layered the cards together. The piece that had the flowers was the front of the card. I adhered adhesive to the 2" piece and attached it to the back of the other cardstock. Here is a photo of how the sentiment looked on the bottom piece's 2" folded piece.

Here is a photo of the top fussy cut edge opening up over the sentiment. I really hope this makes sense. It was really easy to make and an easy way to make a gate fold card.

This was a fun card to make and I hope Mom enjoys it. I love the colors, and had a great time creating it for her.

Thanks for stopping by. Have a magical day!

-Chris

Sparkle N Sprinkle compensated links are used when possible.

Wednesday, February 15, 2017

Sparkle N Sprinkle's Luck of the Irish Clovers {02.15.2017}

Sparkle N Sprinkle February stamp release

Hi! I made a card using Sparkle N Sprinkle's Luck of the Irish Enchantress stamp set, which is one of their stamps for their February release. The stamp set is really cute, with this sweet little girl sitting in a pot of gold.

But, I wanted to show that the stamp set can be used in multiple ways. So, I made a card using only the clover and one of the sentiments. Here is my card.

First of all, I "stamped" the sentiment by lightly rubbing the Nuvo Glue Pen Large onto my sentiment stamp. Then, I stamped the sentiment onto cardstock, and then I let the glue dry until it was tacky. After it was tacky, I dusted on the Silver Bullion Gilding Flakes and rubbed the flakes into the tacky glue with a Mini Blender Brush. I dusted off the unstuck flakes, and viola!, the sentiment was gilded! I die cut the sentiment into a tag shape, and distress inked the edges to give it some extra dimension.

I die cut a little grommet circle from my tag dies, and covered it with Versamark Ink, and sprinkled on Forest Green embossing powder and heat set it. I repeated this several times to give the grommet a lot of dimension. Then, I dotted some adhesive from the Fine Tip Nuvo Glue Pen and then adhered the grommet to the tag.

Embossing Powders

I wanted to use several green embossing powders to make a field of clovers for my background. I whipped out my Forest Green, Moss, Spring Willow, and Key Lime embossing powders. I dusted my cardstock with my Anti Static Bag, then stamped the clover a few times with my Versamark Ink Pad. I sprinkled on one of the embossing powders, heat set it, and repeated it as I filled the card with multiple clovers in the four different green embossing powders. I continued this until I had filled the space enough. After this was done, I dotted little adhesive dots using the Nuvo Glue Pen Fine Tip. I let the glue get tacky, then added Silver Bullion Gilding Flakes. I pressed the flakes into the adhesive, then dusted away the left over gilding flakes using the Mini Blender Brush.

I die cut four hearts and arranged them into a four-leaf clover shape as the background of my card. I layered everything together, and had a uniquely shaped, clover card with a wonderful sentiment! This card was really fun to make and I love how it came together.

Thanks for stopping by. Have a magical day!

-Chris

Sparkle N Sprinkle compensated links are used when possible.

Monday, February 13, 2017

Bunny Spinner Card {02.13.2017}

I have seen spinner cards on blogs and in stores, but never made one ... until today! This is my first (and not last) spinner card. Let's check it out!

The stamp set I used has this bunny stamp, with a "front" of the bunny and the "back" of the bunny, along with a die piece. The bunny shapes are the same, so once die cut and layered together, the front and back perfectly line up. Here is the back of the bunny. The egg is the same shape from front and back.

To make the card, I stamped out the images, colored them, die cut them, and then die cut holes in the card front and panel to allow the bunny to spin. I adhered the bunny and egg onto a piece of thread, and then adhered the thread underneath the card panel onto the front of the card base. I twisted the bunny and egg and held them when I closed the card and slid it into the envelope. When the recipient pulls it out and opens the card, the bunny and egg spin! It is really fun!

I also stamped a sentiment in the inside of the card. I strategically placed it where it wouldn't show when the card was closed.


This card was fun to make, and sure brings a huge smile to my face. Now that I have made a spinner card, I can see how I can adapt almost any image and die to make a spinner card with whatever I have laying around in my stash. Easy peasy and fun! Give it a try!

Thanks for stopping by. Have a magical day!

-Chris

Sparkle N Sprinkle compensated links are used when possible.

Friday, February 10, 2017

Pink Butterfly Card for Mom [#06/52] {02.10.2017}

Hi! Today's card for Mom uses patterned paper and die cuts, and NO STAMPING! Sometimes ya just gotta not stamp. Let's check out this card.

I created a top-folding card base with pink cardstock. Then I cut some patterned paper to make a card panel, and distress inked the edges. I cut a smaller piece for the card focal point, and also distressed the edges. Then, I fussy cut some flowers and leaves from a corner, and layered them on top of the card focal piece. Everything was layered up with foam tape for dimension. I also cut out a solid butterfly and an intricate butterfly using dies from coordinating patterned paper. I also inked up these edges.

I raided my stash for some bling and used it to make a bit of a trail for the butterfly.

This card came together pretty quickly. I love patterned paper, but I don't use it enough. I challenged myself to use some up with this card, and I really like the result. A card that can be used for almost any situation, using some gorgeous paper. And, who doesn't love butterflies and bling!?!

Thanks for stopping by. Have a magical day!

-Chris

Sparkle N Sprinkle compensated links are used when possible.

Wednesday, February 8, 2017

Sparkle N Sprinkle Purr-fect Friend card {02.08.2017}

Sparkle N Sprinkle's Sitting Pretty Kitty Digi Stamp

Let's check out the card I made, also appearing on Sparkle N Sprinkle's blog today, with the new Sitting Pretty Kitty digital stamp set.
Sitting Pretty Kitty
I made an easel card. Here is the card opened and propped up, on the sentiment "stopper" which keeps the card front propped up.

Glitters

To make the card, I sized the digital kitty image and the sentiment to the sizes I wanted and printed them on cardstock. I printed two copies of the kitty image, and cut up one of them. I fussy cut out the butterfly, bow, flower leaf, and tail. I popped those up for added dimension on my final card. You can see the kitty's face really well here. I used the Nuvo Glue Pen-Small Tip to add adhesive to the eyes. I sprinkled on Ocean glitter. I also used the glue pen on the butterfly, and added on Tiger Orange and Daisy glitters. I used the glue pen and rolled over the whiskers, and sprinkled on Sparkling Snow glitter. I sparkled up the bow too, and used Ballerina and Orchid Rose glitters. I also used the Ballerina glitter inside the ears.

I also used more Nuvo Glue Pen-Small Tip on the leaf, and sprinkled on Luau Green glitter. I also sprinkled on Peruvian Lily glitter on the kitty tail. Look how pretty everything is.
Sitting Pretty Kitty digi stamp flower and leaf image
Here is the sentiment I printed out. I sized it so that it basically filled the label die I was using as the "stop" for the easel card. I again used the Nuvo Glue Pen-Small Tip and added adhesive to the "broad" brush strokes on the "purr-fect" part of the sentiment. Then, I sprinkled on Hyacinth glitter. This really made the sentiment so much more fun! It was super sparkly, and much brighter in person.
Sitting Pretty Kitty digi stamp You're the Purr-fect Friend sentiment
I really enjoy working with digital stamps. It is so much fun to size them into whatever I want to fit the card or dimension that I need. I also love this kitty. He looks so sassy and a little bit perturbed, just like cats normally do. As the saying goes, "Cats have staff" which is so true. They rule the house and we have to do what they want. I wouldn't want it any other way :)

Thanks for stopping by. Have a magical day!

-Chris

Sparkle N Sprinkle compensated links are used when possible.

Monday, February 6, 2017

Crazy Bird Hello {02.06.2017}

Today's card is just a sweet little Hello card!

I made this Hello card using a Tim Holtz Crazy Bird stamp to just say hello to a friend. I stamped out the image, then colored the bird with markers, and then cut it out with a matching die cut. I stamped the sentiment and than layered on a hill slope and puffy cloud in the sky. Here is a closeup of the birdie.

This was a simple card to make, and it is something that I need to remember when I need a quick card.

Thanks for stopping by. Have a magical day!

-Chris

Sparkle N Sprinkle compensated links are used when possible.

Friday, February 3, 2017

Hello and Sparkly Roses card for Mom [#05/52] {02.03.2017}

Hello! Hi! How's it going? Tee hee. This is this week's card to Mommy, saying HELLO! Let's check it out.

This card was so much fun to make. I love bright colors, hence the rainbow flowers and leaves. I also wanted to make a white on white card, so this worked out really well. I used a lot of dies and layered everything up. I used oval dies, flourish dies, and background dies, along with embossing folders for texture. I die cut the sentiment using Lawn Fawn's Louie's ABCs, on cardstock that I had previously printed a solid covering of black toner ink, so I could foil the letters. I foiled them with a rainbow foil, and mounted them on foam for added dimension. Here is the sentiment up close.

I also scraplifted from myself! Check out this blog post, for a card I made for Sparkle N Sprinkle. I made these flowers the same way as the linked blog post, using the same products. For the red rose, I added Sparkle N Sprinkle's Gypsy Red glitter. For the orange rose, I used Sparkle N Sprinkle's Autumn Medley glitter.

The yellow rose has Sparkle N Sprinkle's Evening Glow glitter, and the blue has Sparkle N Sprinkle's Princess Anna Royal glitter.

And the purple was Sparkle N Sprinkle's Tyrian glitter.

I also stamped a sentiment on the inside of the card, over some patterned paper. She seriously IS the best mom ever!

I know my Mom enjoyed this card. She called me right after opening the mail. She LOVES It! I am so glad it made it to her safe and sound.

Thanks for stopping by. Have a magical day!

-Chris

Sparkle N Sprinkle compensated links are used when possible.